

How to Connect an Air Heat Exchanger to a Plenum: A Complete Guide
Posted by SEBASTIAN ZOTA
This is another Alternative Heating & Supplies episode and in this chapter, we will continue our discussion about how to install a water to air heat exchanger inside of a hot air furnace. In chapter one, we talked about considerations that you need to think about before and where you're going to install your heat to air exchanger inside of your hot air furnace. In this one, I'm actually going to talk about how to install it.
It's actually so easy, people usually can't believe it's this simple. But what we're going to do is I'm going to use a cardboard box here as described in the first video and what I'm going to be showing you here is how to cut it in.
Air Heat Exchanger Installation Parts and Troubleshooting:
The H-Cut
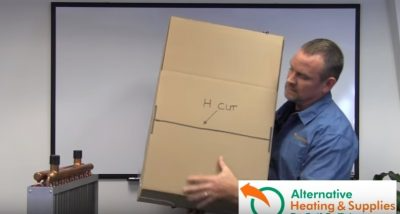
The Heat Exchanger H-Cut
Now, in this case, is what I call an H-cut. Now, the H-cut is simply what it basically says. The heat exchanges in which I sell and most the heat exchangers out there are usually about three and a half inches in height.
So what you're going to do is you're going to measure the width and the depth of your plenum. So in this case, this is an 18" x 18". So I got a heat exchanger accordingly. But what I'm going to show you in this video is that you don't want to try to buy an 18" x 18" exactly.
The Plenum
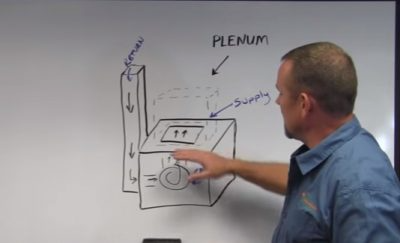
The Heat Exchanger Plenum
What you're gonna do is you're gonna measure up in your plenum. And this is a plenum that's represented here in this picture, so you've got the return, the hot air furnace. And this is the plenum. And this is the duct work that goes throughout your house.
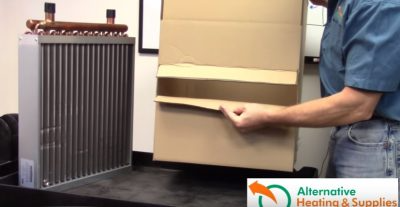
The Heat Exchanger H Cut Open
So what you're gonna do is you're going to make an H-cut. And in that H-cut, you're gonna make one on the front side and also the backside of your plenum, as you can see here, simple H and a line across. And you're gonna cut it open and cut it open and you're gonna do the same thing on the opposite side. Now simply what you're gonna do is you're gonna slide the heat exchanger in and then back out the back side.
Now, when I measured this plenum, this cardboard box, it's an 18" x 18". So in this case, the heat exchanger that I've sized for this is actually an 18" x 18".
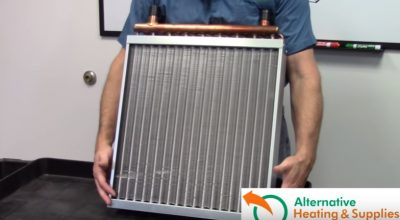
The Heat Exchanger
And what that measurement really is, the heat exchangers in which I sell, the actually finned area is 18" x 18". As you can see, there's an extra 3/4" here, 3/4" here on the framing, and obviously the manifold here. So that is actually going to maximize my usage of my plenum.
So in our catalog here, we actually have a diagram of the actual dimensions of A, B, C, and D, the dimensions like A, the B, the C, and the D, the depth, in which we'll show you in the catalog.
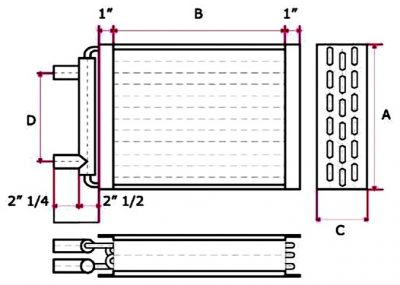
Plate Heat Exchanger Diagram
So what I'm gonna do is I'm gonna show you how this mounts inside the heat exchanger or plenum and I'll get to that in just a second.
The Heat Exchanger Environment
So what I'm gonna show you here is how we've maximized the fin area inside the plenum. So the heat exchanger is not all in the plenum. That's why we do it this way. And also, it gives it a stable environment. It doesn't allow air to come through the sides. There is nowhere for the air to go except right through this heat exchanger. Now I'm gonna show you how to tighten it back up, to seal it up so you get no air loss.
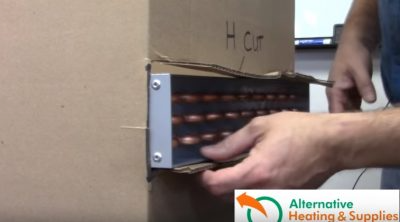
The Heat Exchanger H Cut and Installation
As you can see, the heat exchanger comes through the heat exchanger, which gives it a nice shelf to sit on. And what you're gonna do is you're going to basically, in this case, you're gonna trim this.
Sealing the Sides of the Heat Exchanger
Now, I'm gonna trim this tin, which in this case is cardboard, about half an inch to three-quarters of an inch longer than the heat exchanger. And I'm going to show you why in just a second. This is a little trick I figured out when I was installing them so many times. What I noticed was, I wanted to seal this up but if I trimmed it away, I had to deal with this hole here and the air coming in through here. But I had all this in extra. So what I realized and I found, the best tool to use is a channel lock.
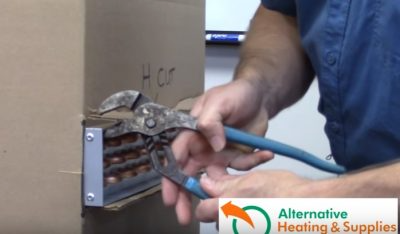
Trimming the Heat Exchanger with a Channel Lock
So what I would do is I would simply take the channel lock, put the tip of it, grab the tin, and then it bends it around the heat exchanger beautifully, securing it amazingly. And you just kinda keep going down, all the way down the heat exchanger and you do it on both sides. And it actually, once you get the hang of it, you actually get going pretty quickly, it comes up and bends around. So now you've got a nice, tight seal on the heat exchanger this way.
Now all you need is that aluminum foil tape, which you pick up at your local hardware store. And you seal the sides and I seal down the sides, so it makes it nice and airtight. And I do it on the front and the back.
The Heat Exchanger FAQs
Which Is the Supply and Which Is the Return?
The next thing that we're gonna do once that's installed is a lot of people ask, "Well, which is the supply and which is the return?" Well, here's a simple question to that. Air will actually go up and it makes it a little easier to get the air out of the system if you bring the supply in on the lower port. Because it will push the air up to the upper manifold and then out and return it to your stove. That's why I bring my supply in and then out so the air can get out of the exchanger. You won't get any bubbling effect. Eventually, even if you swap it around and do it the opposite way, it still works just fine. But this I found to be a little bit easier, quicker, and less problematic.
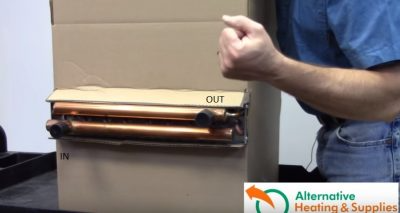
Heat Exchanger In and Out
Cutting One Hole on the Side of the Plenum to Make a Little Shelf
Another thing that people ask me about is, "Why can't I just cut one hole and put little things on the side of the plenum to make a little shelf?" Absolutely you can do that. The problems that I find out with that is that you're trying to cut and now you have to put your arms in a slot that is four inches wide. The tin is sharp and the tools that you're using are probably not the high-end tools. So you're going to have rough edges and you're going to find out you end cutting your arms pretty badly in trying to figure out how to get something in there and screw it into the side to make it nice and level. I found it extremely difficult. That's why I found this way of going all the way through it easier.
How to Install the Ports?
Now, a lot of people ask me, "Well, on our heat exchangers, is it better to have the ports coming out the front, the back, the side?" It's up to you and where ever you have the most room. Usually, on these hot air furnaces, the return is one of the reasons that you can't have it facing the return because it's in your way. But just chose your way, there's nothing right or wrong about it, just get it in.
Check out chapter three of how to get your hot air furnace to work with your new heat exchanger in there. And that's gonna be talking about the thermostats and other wiring options that you might have.
